Welcome to the wonderful World of Skynamo Analytics!
Skynamo has a brand-new reporting API specifically designed to get your Skynamo data for the purpose of reporting. As well as a custom connector for Power BI specifically developed to use this new reporting API!
How to get access?
The good things in life are never free, and the same goes for access to the Skynamo Reporting API and the Skynamo Analytics Power BI Connector.
You can get a quote and add Reporting API to your billing by following the instructions here:
After the above has been done, let support@skynamo.com know and they will provide you with:
- Credentials to access your Skynamo data through the reporting API (Client ID, Client Secret).
- The Skynamo Analytics Power BI custom connector file (SkynamoAnalytics.pqx). As well as the thumbprint to trust the provided connector.
I have access, now what?
1.Reporting API
For more information on using the Reporting API and examples go to the Swagger documentation:
https://analytics-api.svc.skynamo.me/swagger/index.html?urls.primaryName=v2
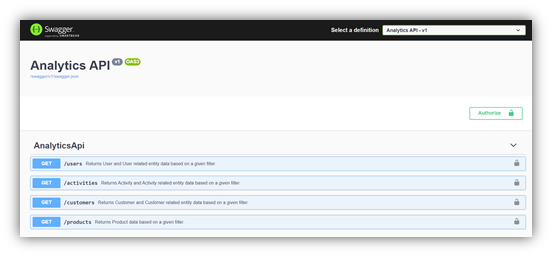
The provided credentials can be used in a CURL request (see below) to get an access token to Login by clicking on Authorize.
curl --request POST \
--url https://login.skynamo.me/oauth/token
--header 'content-type: application/json' \
--data '{"client_id":" ","client_secret":" ","audience":" https://integration.skynamo.me/","grant_type":"client_credentials"}'
2. Power BI Custom Connector
Have you heard of Power BI?
This connector was specifically created for Power BI. Therefore, to use it requires the Power BI Desktop app or a workspace with access to the connector on Power BI Service.
Power BI Desktop is easy to install, and no license is required if you are only developing reports for your own purposes.
For a team to be able to access and use the connector to develop, share, and edit reports will require that each user has, at least, a Power BI Pro license. Read more about the licensing options here.
Where to place the Skynamo Analytics Power BI Connector file?
The Skynamo Analytics Power BI Connector is still in development. Therefore, the connector is expected to be changed and updated in the future. We will strive to ensure that you always have the latest version of the connector.
The below once-off setup will need to be done on a personal computer if only required for personal use.
The below once-off setup will need to be done on the computer used for the Power BI On-Premises Data Gateway if it is to be used by a Team with workspaces on Power BI Service.
Once-off Setup
- Download and install Power BI Desktop
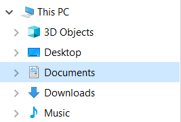
- Place the provided Skynamo Analytics Power BI Connector file (SkynamoAnalytics.pqx) in the below file path. Create the path if it does not exist.
C:\…\Documents\Power BI Desktop\Custom Connectors
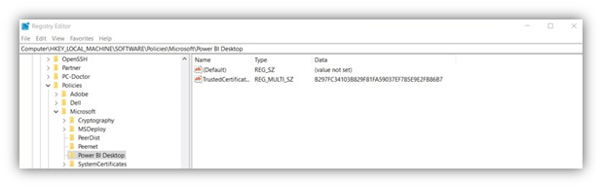
- Trust the provided connector (Admin rights on the computer is required)
- Double click on the provided .reg file and follow the prompts.
- The above will add a registry entry (in the Registry Editor) to the following registry path as shown in the screenshot:
HKEY_LOCAL_MACHINE\Software\Policies\Microsoft\Power BI Desktop
How to use the connector?
- Open Power BI Desktop.
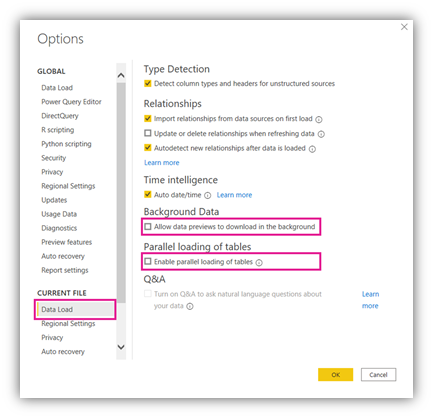
- Set CURRENT FILEsettings to reduce stress on server:
- Go to File > Options and settings > Options
- Scroll down to the CURRENT FILE section and click on Data Load
- De-select the following settings:
- Background Data > Allow data preview to download in the background
- Parallel loading of tables > Enable parallel loading of tables
- Click OK
- Select the connector under Other using Get Data.
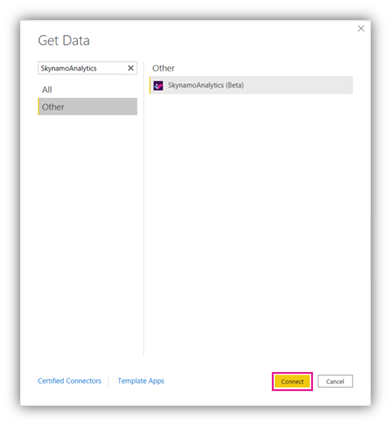
- Connect to the Skynamo Reporting API.
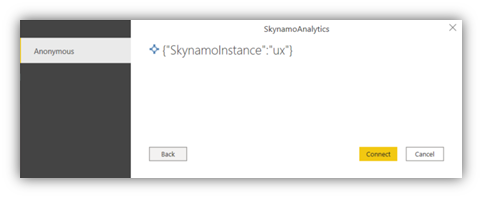
The following inputs are requested:
- Skynamo Instance Name (Required)
- Client ID (Required) - Skynamo Reporting API credentials
- Client Secret (Required) - Skynamo Reporting API credentials
- Reporting Period (Optional) - Defaults to the last 30 days.
- Financial Year start date - Defaults to 1 January.

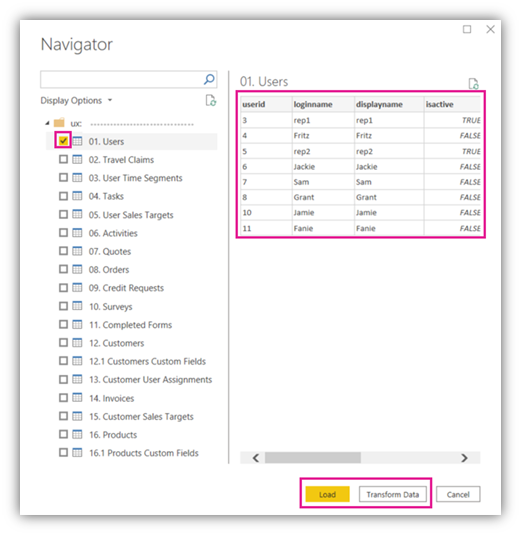
- The Navigator Page shows 18 tables available for selection. To select the tables to include on Load/Transform Data:
- Click on the radio button next to the relevant table.
- A preview of the data in that table (Top 1000 rows) will be evaluated and shown.
- Repeat the above for all the tables you want to include.
- Click on Load to load the selected tables into Power BI Desktop or Transform Data to implement some transformations before loading the selected tables into Power BI Desktop.
- Use the selected tables and Visualizations to create a report.
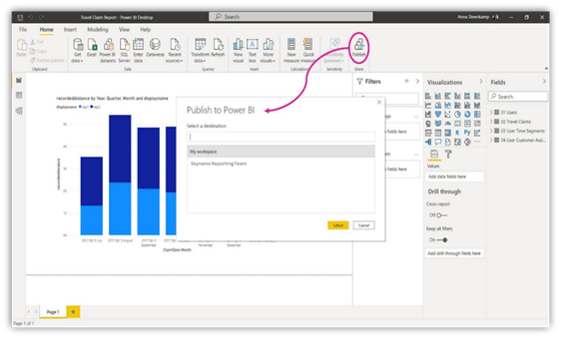
- If required publish the report to Power BI Services.
The Data
The Reporting API has four endpoints that returns data for 19 entities/tables.
The Skynamo Analytics Power BI custom connector makes the calls to the Skynamo API to get the data from the 19 entities. The data is then transformed and shown in 21 tables in the Navigational table. The 21 tables are shown in the below table.
The columns returned per table have been limited to improve the efficiency of the connector. For example, the Travel Claims entity returned by the Reporting API has the user_id and display_name fields, the same table in the connector only shows the userid column. The displayname value can be retrieved from 01 Users, using the link between the userid column in both tables.
The following images show the entity relationship diagrams per Reporting API End Point for all the tables related to that end point as the tables appear in the Skynamo Analytics Power BI custom connector. The relationships between End Points are also indicated. The main table of each end point has a pink border.
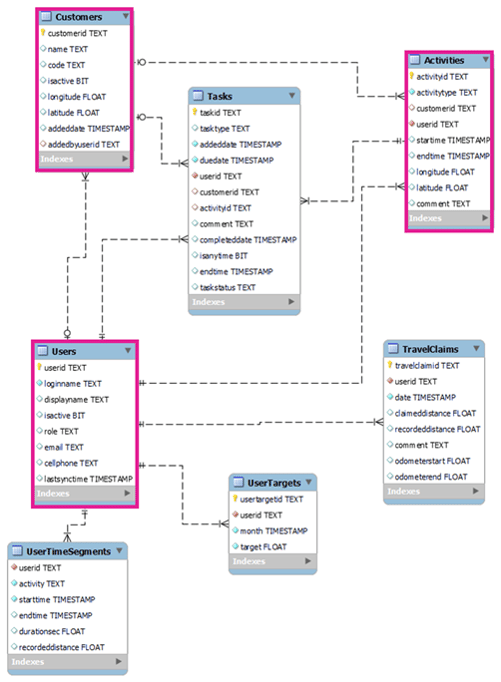
ERD of Power BI Tables from Skynamo Reporting API Users End Point
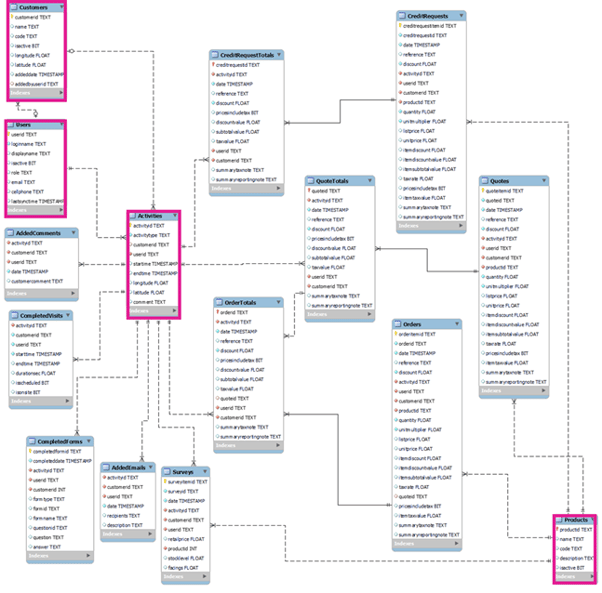
ERD of Power BI Tables from Skynamo Reporting API Activities End Point

ERD of Power BI Tables from Skynamo Reporting API Customers End Point
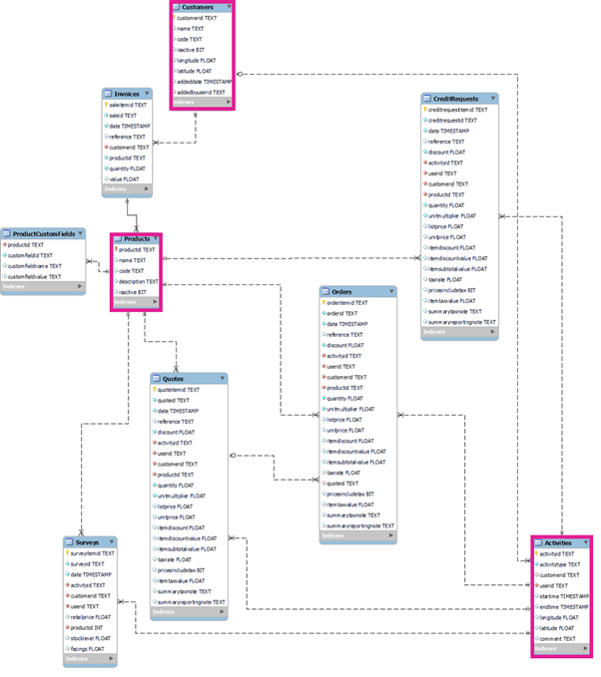
ERD of Power BI Tables from Skynamo Reporting API Products End Point